
Localizor manual
Get all the information you need to translate subtitles in Localizor – Blu’s online subtitling tool.
1.0 – Assignment
Watch the video tutorial on how to get started in Localizor
When assigned to a localization project, whether it is a movie, a full TV season or a TV episode, you will receive an email, asking you to Accept or Decline the assignment in Pipeline under Assignments.


To log in to Pipeline and see your assignments and profile, please go to the following website: https://pipeline.dicentia.dk/
If you’re having trouble logging in or you have lost your password, please write to localizor_support@dicentia.dk and request new login credentials.
1.1 – Negotiation and counteroffers
Before accepting or declining an assignment, you have the options of suggesting another deadline that fits your schedule and suggesting another rate than the one offered in the assignment. You can do this by simply changing the input in the “Rate” or “Deadline” field and pressing Submit.

If you choose to make a counteroffer, you will be notified by email when it has been either approved or rejected by us, and then you can decide if you want to accept or decline the assignment.

2.0 – When logged in
When logged in, you will see an overview of the titles you have been assigned to. You can toggle between current and previously submitted assignments, by using the buttons above the calendar overview.
Click on your assigned title to go to the asset assignment overview.

3.0 – Updating profile information
In order to receive work from us, you need to make sure that your profile in Pipeline is filled out with correct information. To update your information start by clicking on your initials in the top right corner of the landing page as marked on the screenshot.

At the top of the profile information page you can choose the services you offer. These could be translation, proofreading, template creation and so on. These settings will be saved automatically when you toggle a service on or off.

Just below the list of services you’re able to inform us of your weekly capacity by writing the amount of minutes you’re able to translate in a week. This is saved automatically as soon as you change the number.

In the “Prices”-section you need to list the prices for each service you provide. Please remember to choose the right currency using the drop-down menu at the top of this section as marked on the screenshot. The information in this section is saved automatically.

In the “Languages”-section you need to choose all the languages you translate to and from and remember to click the green “Save”-button. You can also remove your previously saved languages by finding it under “current languages” as marked on the screenshot and clicking on it.

In the next section you need to make sure that you’ve filled out your current location and native language. It’s also in this section you should inform us of your subtitling experience, how long you’ve been doing it, for what platforms and so on. If you have your own subtitling tool besides our Localizor, you should also tick off the “yes”-button and let us know which tools you have access to in the field below. You’re also able to link to your website and upload your CV and a proof of residency. To save this information, click the green “Save”-button at the bottom of the section. Before you save you should make sure to tick off the GDPR-button as marked on the screenshot which allows us to store your information for the next year.

It is also very important that you make sure that you upload a signed NDA to your profile. You can do so by clicking the “Download Blu NDA”-button and either printing it out and signing it physically or signing it digitally. If you’re signing it physically you need to scan it back to your computer. In either case you need to fill out both pages of the NDA-template and make sure that the final NDA-file is in a PDF-format. The next step is to upload, which you do by clicking the outlined button that says “Drop your signed NDA here” and choosing your signed PDF-file before finally clicking the “Upload signed NDA”-button. When you have successfully uploaded your signed NDA, you can always download it again by clicking the button that says “Download your NDA”.

At the bottom of the page you also have the option to change your password and email. If you ever forget your password, please let us know, and we’ll send you an email with new login information.
4.0 – Asset assignment overview
In the asset assignment overview you will see the specific assets you have been assigned to. In this case a German subtitle. By clicking the T button, you will open Localizor.
The 5 white dots represent the progress of the assignment.

- Translation processing
- Translation submitted
- Proofreading submitted
- Approved by Blu
- Delivered
5.0 – Localizor
Screenshot of Localizor.

You can switch positioning of the translation and video blocks by clicking the left and right <—> arrows in the the top right-hand side of Localizor (crtl + p, cmd + p). In the translation edit window you will see the template text to the left, and the translation edit fields to the right.
5.1 – Video navigation
You can control the video like you normally do with Play, Pause (alt + or ESC) or by dragging the playhead to the desired position.

When changing the playhead position the edit view will follow and show you the corresponding translation edit field ready for typing.
You can also do it the other way around, by clicking the paragraph block, which will jump to the desired position in the video (edit fields excluded).
You can choose to keep the video playing while entering edit fields by toggling the button beneath the player window.

Playback speed can be controlled using the control buttons below the player. You can change between normal x1, x1.5 and x2 playback speed as well as slow (turtle icon), which is a 25% decrease in playback speed. When video is paused you can jump in increments of 1 frame back and forth using the -1f and +1f buttons, and 1 second back and forth using the -1s and +1s buttons.

5.2 – Typing
You can start typing in the translation edit fields next to the template text. If you deem a translation unnecessary or redundant, e.g. if the template text is a universally known word like ‘Okay’, you simply leave the translation edit field empty. However, the translation field may not be empty, if the proofreading field is to be used.

Keyboard shortcuts to navigate between edit fields:
Next field = Tab or PageDown (PgDn)
Previous field = Shift + Tab or PageUp (PgUp)
5.3 – When typing
When typing, characters per line and characters per second (CPS), as shown to the right of the translation edit field, will continually be updated to reflect your typing. These will change color if their respective thresholds are exceeded.
Once a draft of your translation exists – created the first time you click ‘Update draft in player’ – typing will be updated in the player in real time when typing. In rare cases the browser is not fast enough to update, and the text in the player is not fully updated, in which case you simply click ‘Update draft in player’, and then your text is shown in its current saved form. Also, sometimes the text may disappear or look weird, due to slight frame differences when the cue is added to the player. Simply play the video for your text to appear.

5.4 – Formatting text
You can format the text by clicking the italics icon next to the translation edit field or use a keyboard shortcut (crtl + i, cmd + i). You can format words, lines or the entire paragraph. The translation edit field will reflect your formatting.

5.5 – Top- and bottom-aligning subtitles
You should always make sure that your subtitles aren’t blocking any on-screen text. You can top- or bottom-align the subtitles by using the button found below each line of the template.

5.6 – Merge Paragraphs
You can merge two paragraphs by using the merge button on the left. When hovering the merge button the background will turn green to show which paragraphs you are about to merge. When merging you may need to rearrange the text between the two edit fields, to make sure that the number of characters per line is not exceeded. You can’t merge paragraphs which in total exceeds the characters per line threshold. The tooltip will show total duration of merged paragraphs.
If merging with an empty paragraph, the system will divide the paragraph containing text between the two paragraphs, as otherwise the system will ignore the empty paragraph when outputting the final subtitle. You can re-arrange the divided text afterwards, if the automated division is not to your satisfaction.


When you have confirmed that you want to merge the two lines, you get the options of either merging with a linebreak or with a single space. If the lines can be merged with a single space without exceeding the limit for characters per line, Localizor will recommend that you do so.

5.7 – Search (alt + f)
You can search lines or text (both template text and your own translations). Jump to the preferred paragraph by clicking the relevant option in the listed search result(s). The search results are preceded with a line number. A ’T’ before the line number is short for Template.
The search result box stays on screen until you remove it (by clicking the magnifying glass), so that you can click through all of the results without having to search over and over again.
You can move the search result box to a position of your choosing by dragging the box.

Searching for text or a specific paragraph number.

5.8 – Show subtitles in Player
In the player, when a video is loaded, the template text is enabled by default at the start of each new project. Once you have started your translation and clicked ‘Update draft in player’, your draft will be enabled as default.

You can change the subtitle you want to see in the players subtitle menu. To do that, you should first click the ‘Update draft in player’ button below the translation editor, then choose Draft in the players subtitle menu. It may take a couple of seconds for the draft to be visible in the players subtitle menu – depending on the number of subtitles. The video will pause if you click the ‘Update draft in player’ button while the video is playing.
Whenever you want to see your latest draft, click the ‘Update draft in player’ button. If you have already chosen the Draft in the players subtitle menu, you don’t have to choose it again each time you click the ‘Update draft in player’ button. When merging, the draft is automatically updated in the player (this may take a few seconds).
In Firefox and Safari, once you have started translating and clicked ‘Update draft in player’ once, your typing will be updated in real time in the video player (if video is loaded). See also section 4e.

5.9 – Validate your work (alt + v)
When you are done with your translation, you need to validate your work by clicking the Validate button or use the shortcut keys alt + v.

The validator will list errors, warnings and other valuable info:
- Too many lines
- Too many characters
- Reading speed exceeded (CPS)
- Concatenate to one line (suggestion, if two lines without hyphens are below max characters)
- Hyphen spacing checked (language specific)
- Hyphen specs checked (language specific)
- Whitespace issues (usually double white space or space before periods and commas)
- Empty paragraphs (may be intentional, see section 4d)
- Redundant text (e.g. if the translation is the same as an on-screen text)
- Proofreader suggestions (for easy locating in translation editor) stating if approved/rejected
- Merged text (for easy locating in translation editor)
Each error, warning or info is listed with a timecode and paragraph number. You can click each listing to jump directly to the given translation edit field. Please do your best to get close to zero validation errors. If in doubt, use the communications tool in Localizor to contact a Blu representative (section 4k).
Filter validation results. Use the drop down menu (Show all warnings) to filter the validation results, and see a count of each validation type. Click the red warning triangle to toggle the validation results on and off, and to see a count of each validation type.

5.10 – Spell checking
Localizor’s spell checking utilizes your browser’s/operating system’s built in spell checker, but many prefer a different/better spell checker in their favored Word processor.
You can download you translation as a .txt file for local spell checking by clicking the Download button.

5.11 – 5-point QC
5-point QC is available on select titles, where you can easily jump to the 5 sequences required to be QC’ed for 5-point QC.

You can jump to each section using the drop down selector.

5.12 – Communication
If you have questions regarding the translation or Localizor, or if you have found errors in the template text, you can communicate directly with a Blu representative using Localizor’s communications tool. The translator and proofreader can also communicate via this channel, e.g. during proofreading or evaluation of proofreading.
Simply click the dialog box below the editor to start a thread. Whenever a comment is sent, everyone involved in the project will automatically be notified via email.
Tip: If you have a question or comment regarding a specific subtitle line, include the timecode in your message. That way, the subtitle will be clickable and lead the user directly to the specific paragraph. You can then click on the start timecode of a sub and it will automatically be pasted into your comment.

Write your comments
For each comment you are required to select one or more topics that reflects your comment. This helps us sort between the different types of messages, hopefully resulting in a faster response time.

Reply to comments
If there are many different comments in the comment section, you can make communication easier by using the reply function. By clicking the “Reply”-button you automatically quote the comment you want to reply to, after which you can conveniently type your answer.


Attach files to comments
You also have the option to attach files to your comments. Do so by dragging your file and dropping it in the section to the right side of the comment field.

The file can now be downloaded by clicking the file icon in the comment as marked on the screenshot.

5.13 – Submit your work
Once you are confident that your work is done, and validation errors are at a minimum, you can submit your work. Submitting does the following depending on your role:
- Translator: This will notify a proofreader (if one is assigned), that your translation is done. When you have submitted, you won’t be able to edit your translation while the proofreader is working.
- Proofreader: This will notify the translator that you are done proofreading and you won’t be able to make any further suggestions.
- Translator: When you submit after evaluating the proofreaders suggestions, the proofreader will be notified. Again, you won’t be able to make any edits after this point.
In all three instances a Blu representative will also be notified.
If it’s necessary that you as a translator or proofreader need to make further edits after submitting, please ask your project manager if it’s possible.
If you’re working on a TV-series that’s not a Day-After-Broadcast-project and you need to make changes to a previous episode, please let your project manager know, and they will unlock the episode for you.
5.14 – Proofreading
When proofreading, typing is done in the hidden proofreading edit field below the translation edit field. You unfold the proofreading edit field by clicking the small glasses icon at the bottom left-hand corner of the translation edit field. As a proofreader you should also validate, to see if any issues persist from the translator.

For convenience you can copy the translated text to the proofreading edit field, which makes it easier to get the translation into the proofreader field and edit minor mistakes.

The proofreader field is not meant for comments, but for a complete translation which the proofreader deems better than the original one, e.g. a rephrasing or a spelling correction. If approved by the translator, the suggested line will end up in the final subtitle file, so it’s very important that you don’t use the proofreader field for comments. It is also encouraged that the proofreader explains their suggestions by using the reason codes and the note section located just below the proofreader field.

If the proofreader deems the translation of a specific line unnecessary, they have the option of simply choosing the reason code “Redundant” while leaving the proofreader field empty. This will notify the translator that it’s been suggested to leave that line out of the final subtitle.
Once you are done proofreading, you submit your work. The original translator will then be automatically notified via email, and is asked to evaluate your suggestions/corrections. Sometimes when submitting your proofreading, you will also be prompted by Localizor to evaluate the translation. This evaluation consists of the following three subjects that you will be asked to rate and comment on:
- Spelling, grammar and punctuation
- Idiomatic language and readability
- Adherence to guidelines
You also have the option to leave a comment on the general level of the translation.
Approve or Reject a proofreading. When a proofreader has submitted their work, the original localizor should open the project, click on Validate, filter by proofreader suggestions, and evaluate each suggestion by approving (alt + A) or rejecting (alt + R). You jump directly to a suggestion by clicking the listed items. The ones you haven’t evaluated will state ‘No standpoint made by localizor’. Using alt + arrow up/down, you can jump between proofreader suggestions faster.

If a proofreading edit field is not empty, the glasses icon will turn red. It will remain red until the original translator has either approved or rejected the suggestion.
5.15 – Offline work
If your internet experiences low connectivity, or Blu’s servers experience an outage, Localizor will go into offline mode. Offline mode means that you will save your work locally in your browser. This will happen automatically. The offline feature is a safety measure, not meant to be used extensively.
IMPORTANT! Do not set your browser to clear cache automatically, as this will delete your offline work, nor should you run your browser in Private mode, as this will prevent translations from being saved locally in your browser – in case of offline work.
When in offline mode, a distinct red text is shown on top of the translation editor (text may differ from the one shown below).

When the connection has been re-established, you should reopen Localizor. The following alert box will show if you have offline work saved (looks may vary between browsers).

Close the alert box and Localizor will open. In the top right-hand corner of the subtitle editor you will see a blue Restore button.
Click the Restore button to start restoring.

For each paragraph saved offline, you will be prompted with a blue Restore box giving you the option to Restore or Skip the text that was saved while offline. If you click Restore, the text in the juxtaposed edit field will be replaced and saved. Empty edit fields will be restored automatically, as there is no conflict with an existing text.

If the field was empty when typing offline, you will simply be notified about the text saved, and can click Next to continue evaluation of your offline work.

5.16 – Template log
Sometimes the template you’re translating from is updated. Often the template will be offline for a few minutes and when it comes back online, your Project Manager will have left a comment letting you know what’s been changed, and if you need to make any changes to your translation. You can also find the history of all the updates made to a template by accessing the template log which you can find to the bottom right of the translation edit fields.


5.17 – Working with a KNP in Localizor
When working on a project such as a TV-series with many episodes and sometimes even multiple seasons, we often need to use several translators for each language. When this is the case, we have to make sure that every translator translates recurring names and phrases the same way. We do this with our KNP Manager.
Each localisation project has its own KNP Manager which lists all the terms used in the project and their given language translations. You access the KNP Manager from the asset box overview.

In the KNP Manager, you have an overview of all added terms and their given translations. Each cell can be edited or added to.
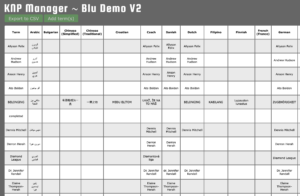
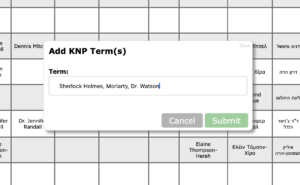
You can also add new English terms, you deem necessary, to the project. You can add one at a time, or multiple terms by separating them with commas in the input field.
After adding a new term, you can then add your translation of that term either in Localizor, where the term will be highlighted in red, or in the KNP Manager, where you click the empty cell for your language in the same row as the new term.
If no languages are listed in KNP Manager, you can still add English terms. To add your translation, you then have to go back to Localizor and find your term in red there, to add the translation in your language.
When working in Localizor with a KNP attached to the project, you will notice that a word in the template can be highlighted in either red or green.
If a word is highlighted in red as in the following screenshot, it means that the word corresponds to a word in the KNP, but that no translator has translated the word in your language.

In this case you’re most likely the first translator from your language to encounter the word and therefore you should decide how you and the rest of the translators should translate it to your language. In order to do so, you click on the word highlighted in red which will trigger a pop-up window, where you need to write your translation of the word in the field marked on the following screenshot before clicking the green “submit”-button.

When your translation of the word has been submitted, the word will then be highlighted in green when encountered again by you or another translator from your language in another episode. When you encounter a green word such as this, you can see how you have to translate it by hovering your cursor over the word as marked on the following screenshot.

You can also copy the correct translation of the word to your clipboard by clicking on the green word in the template in order to paste it into your own translation of the rest of the line.

6. Keyboard shortcuts
General
Change positioning of the video player and subtitle editor, alt + p
Search template and translation text, alt + f
Translation editor
Format text as italics, crtl + i (Windows), cmd + i (Mac)
Validate localization, alt + v
Jump to next edit field, tab or pageDown (PgDn)
Jump to previous edit field, shift + tab or PageUp (PgUp)
Approve proofreading (active field), alt + A
Reject proofreading (active field), alt + R
Player
Play/pause, alt + → (right arrow) or ESC
Skip 1 second forward, alt + +
Skip 1 second backwards, alt + –
7. Invoicing and payment
There are two different processes for invoicing to Blu Digital Group depending on whether you’re working in our subtitling tool Localizor or your own subtitling tool. Please read about these processes and our payment terms on the Invoicing and Payment page.
8. Troubleshooting
As Localizor is an online subtitling tool, you need a stable internet connection to be able to work in it. If something in Localizor still isn’t working properly, please try the following fixes:
- Hold down the “Shift”-key while refreshing the site a couple of times to make sure your browser is using Localizor’s latest scripts.
- Try to disable ad blockers, as they may prevent scripts from loading.
- Try to disable other browser extensions one at a time to see if any of them are causing the issue.
- Make sure that your browser is updated to the latest version.
- Try changing to a different browser to see if that makes a difference.
- Make sure that your browser isn’t running in private mode, as this will prevent Localizor from saving offline work for later restoring.
- Make sure that your browser isn’t set to automatically clear the cache when quitting, as this will prevent Localizor from saving offline work for later restoring.
If none of these fixes work, please contact our support by clicking the button on the bottom right side of Localizor as marked on the following screenshot.

A pop-up window will appear where you can write about your problem or come with a suggestion for our tool. Please tick off either “support” or “suggestion” at the top of the pop-up window, so we know what your comment is about. Please also make sure to attach relevant screenshots by clicking the button on the bottom left side of the pop-up window.

You can also contact our support at localizor_support@dicentia.dk. When doing this, please also make sure to include the relevant screenshots.